PART 1:
- Download the latest version of the "Auto-installer for USB Key (Win 9x/2k/xp/7)" from this link: http://memtest.org/ # downiso
- Insert a blank USB flash drive into a computer port. The size of the flash drive is not a problem because this software requires a space only 180 Kb only.
- Extract the zip file you just downloaded to somewhere and then double-click on Memtest86 + USB Installer.exe.
- Follow the setup utility. To prevent problems, you should follow the format prepared. See picture below
- Download the latest version of "Boot ISO precompiled (. Zip)" from this link: http://memtest.org/ # downiso
- Extract the zip file you just downloaded to a place such as a desktop.
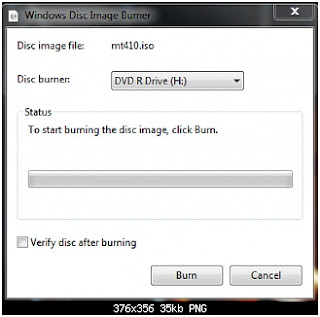
- Right-click on the ISO, and select [Open with> Windows Disc Image Burner].
- Insert a blank CD into the CD drive and make sure your choice right on the [Disc burner]. Look at this picture.
- And than click burn
STEP 2:
- With the CD in the drive, or USB or installed (depending on your method of choice) reboot your computer. If the memtest does not automatically boot, go into the BIOS and change the CD drive or USB drive to be first boot increments.
- Memtest will soon start testing as soon as the boot. No intervention is required in this process.
- Let the process run until at least past the 7 phase is completed, or fault found (whichever comes first). The longer this process goes the better because it means there is no damage.
PART 3:
The goal of this test is to test all the RAM and all the motherboard slots. Check your motherboard manual to make sure the RAM sticks in the motherboard slot as recommended.
If you get an error, stop the test and continue with the next step.
- If your computer is using more than one memory stick, memory, and leave open only one RAM of your computer (leave the RAM stick # 1), and run Memtest86 again, during the seventh phase. If the memory stick # 1 that we pass this test, proceed to step 3 below.
- If the RAM stick # 1 has an error, repeat the test with the RAM stick # 2 in the same motherboard slot. If the RAM stick # 2 escapes the error, it indicates that the RAM stick # 1 may be damaged. If you want to be absolutely sure, re-test the RAM stick # 1 on a different slot. If the RAM stick # 2 has a fault, this indicates faulty RAM stick # 2 slot or failure of the motherboard slots.
- Test RAM (stick # 2) on the other motherboard slot. Observe the results how. If there are errors again, then surely the second RAM is damaged.
- If you find a RAM has passed the test, the test in all other motherboard slot.


Step Technology How To: Test And Damage Diagnosis Of Ram With Memtest86 + >>>>> Download Now
ReplyDelete>>>>> Download Full
Step Technology How To: Test And Damage Diagnosis Of Ram With Memtest86 + >>>>> Download LINK
>>>>> Download Now
Step Technology How To: Test And Damage Diagnosis Of Ram With Memtest86 + >>>>> Download Full
>>>>> Download LINK uN